Descrizione
ALBO ORIGINALE DEL 1971
CONDIZIONI : BUONISSIME, COPIA DI RESA CON LA CLASSICA COLORITURA NEGLI SPESSORI PAGINE INFERIORE E SUPERIORE (NON DEBORDANTE SULLA COPERTINA)
LEGENDA STATO DI CONSERVAZIONE
condizioni ECCELLENTI (o anche EDICOLA e/o MAGAZZINO) = si intende un oggetto nuovo e perfetto oppure usato senza difetti e praticamente ancora come nuovo, tenendone per quest’ultimo caso in conto ovviamente la datazione ; corrisponde a un range di grading internazionale compreso tra 8,5 e 9,8 (non assegniamo punteggi superiori a 9,8 perchè trattasi di tipi ideali a ns avviso più teorici e scolastici che reali e concreti, ogni manufatto umano in natura ha una percentuale insita e congenita seppur infinitesimale di imperfezione)
condizioni OTTIME = oggetto nuovo (o talora anche usato ma maneggiato e conservato con molta cura) in cui non si riscontra alcun difetto rilevante e degno di nota, tutt’al più qualche minimo segno di lettura o di uso ; corrisponde a un range di grading internazionale compreso tra 7 e 8,5
condizioni BUONISSIME = oggetto usato (ed in taluni casi anche fondo di magazzino soggetto a piccole usure del tempo) con lievi imperfezioni e difetti poco vistosi, generalmente molto marginali ed appena percepibili ; corrisponde a un range di grading internazionale compreso tra 5,5 e 7
condizioni MOLTO BUONE = oggetto usato con imperfezioni vistose e difetti abbastanza spiccati, pur se non completamente invalidanti (generalmente specificati nel dettaglio alla voce CONDIZIONI nella parte inferiore della descrizione di ogni singolo oggetto); corrisponde a un range di grading internazionale compreso tra 4 e 5,5
condizioni PIU’ CHE BUONE / MEDIOCRI = oggetto usato con imperfezioni e difetti evidenti, smaccati, madornali ed invalidanti, assolutamente non collezionabile tuttavia idoneo per la semplice lettura o documentazione ; corrisponde a un range di grading internazionale inferiore a 4
per eventuali ulteriori dettagli aggiuntivi e specifici si prega di fare sempre riferimento alla voce CONDIZIONI nella parte inferiore della descrizione di ogni singolo oggetto

| February, 1968 |
|
“Don’t Look Now, But It’s– Dr. Doom!” / SILENZIO C’E’ IL DOTTOR DESTINO
|
|---|
Featured Characters:
Antagonists:
Other Characters:
- Silver Surfer (Norrin Radd) (Mentioned)
- Fantastic Four (Recap)
- Mr. Fantastic (Reed Richards) (Recap)
- Invisible Girl (Susan Storm) (Recap)
- Human Torch (Johnny Storm) (Recap)
- Galactus (Galan) (Only in flashback)
- NYPD
Locations:
- Earth-616
- Earth
- Latveria (Recap)
- United States of America
- New York City, New York (State)
- Latverian Embassy (First appearance)
- New York City, New York (State)
- Earth
Items:
- Body-Transferral Ray
- Doctor Doom’s Armor
- Daredevil’s Suit
- Daredevil’s Billy Club
- Hypnopticon
- Plasti-Gun
Vehicles:
- Silver Surfer’s Surfboard (Recap)
Synopsis
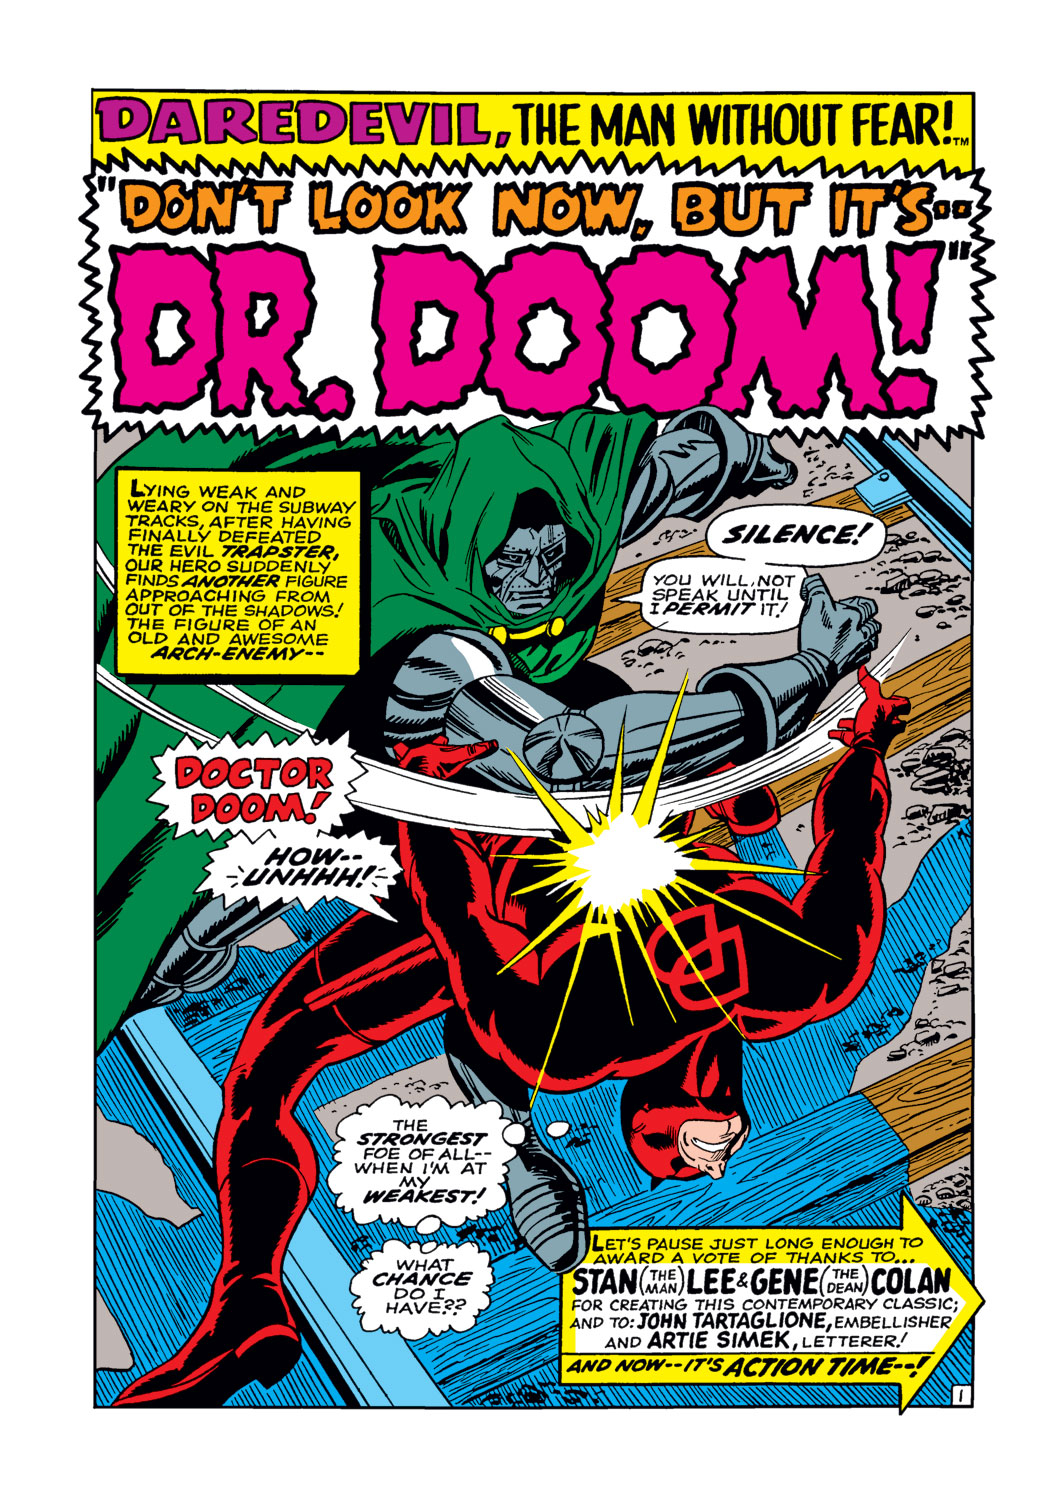
Attacked by Dr. Doom in a New York subway Daredevil must fend off the
Latverian monarch, who plans to use Daredevil as his catalyst for
revenge against the Fantastic Four. Easily bested by Doom, DD is carried
to Doom’s limo which is waiting.

Dr. Doom then takes Daredevil to the
Latverian Embassy, DD revives and tries to free himself along the way,
but ultimately fails. Doom then places DD in his specialized prison
cell.

However, Daredevil manages to escape the cell but is assaulted by
the defenses of the embassy.
Meanwhile, Dr. Doom gloats over how he manage to cheat death
during his last encounter with the FF (in which he had stolen the power
of the Silver Surfer and attempted to pierce the barrier around Earth
put in place by Galactus to keep the Surfer on the planet.)

Weakened, Daredevil tries to attack Dr. Doom again, but is once
more easily fought off, however this time both are trapped in glass
cylinders, and Doom uses a body transferal device to switch bodies with
Daredevil.
Notes
- It’s uncertain why Dr. Doom needs a body transferal device when he learned how to do this on his own from the Ovoids years ago (in FF #10 , in Italy in F4C #7).
- The story references Fantastic Four #60 and Fantastic Four #61 (in Italy in F4C #57 and 58).

Featured Characters:
Supporting Characters:
Antagonists:
- Angel (Warren Worthington III) (quits & rejoins the X-Men)
Other Characters:
- Charlie
- Rocco
- X-Men
- Avengers
- Hulk (Bruce Banner) (Cameo)
- Thor (Dr. Don Blake) (Cameo)
- Giant-Man (Henry Pym) (Cameo)
- Wasp (Janet Van Dyne) (Cameo)
- NYPD
Locations:
Items:
Synopsis

As Iron Man guards a Stark Industries facility during an atomic bomb test, the Angel
flies into the test range. Iron Man sees him and attempts to warn him
of the danger. Just then, the bomb detonates. Iron Man’s armor
effectively shields him from the radiation, but the Angel absorbs the
full force of the explosion, corrupting his personality and turning him
evil. Having recovered from the blast, Iron Man uses his new jet boots
to soar into the air in order to check on the Angel, who flies from him.
Iron Man gives chase until his jet boots give out, causing him to fall
towards the Earth. While plummeting, he uses his “magnetic repeller” to
create a counter-force to help break his fall. He crashes through the
roof of a Stark Industries warehouse, but is uninjured.
The corrupted Angel returns to Xavier’s School for Gifted Youngsters and announces to the other X-Men
that he is leaving the school and joining up with the Evil Mutants,
because “that’s where the action is.”

The X-Men try to talk him out of
this, and as matters escalate, unsuccessfully attempt to prevent him
from leaving. As he flies away, the Angel ignores Professor X’s mental command to return. The Professor is left wondering if he has failed his young charges.
Professor X attempts to use his top-secret communication device to contact the Avengers for help. The Hulk, Thor, Giant-Man and the Wasp)
cannot be reached. Only Iron Man, as Tony Stark, hears the summons.
Feeling responsible for the Angel’s madness, he resolves to make the
young boy come back to his senses.
As the Angel flies over New York City, he figures that if he
makes a big enough show, the Evil Mutants will attempt to contact him.
He steals some sticks of dynamite from a demolition site and goes on a
rampage, tossing them up in the sky, in the water, and near bridges.
Although this does not succeed in drawing out the Evil Mutants, it does
attract the attention of Iron Man.

Iron Man pursues the Angel through the sky, eventually coming to a
stalemate. Iron Man then pulls the Angel down to the ground and tries
to talk some sense into him. The Angel locks Iron Man inside a building
and attempts to get away, but Iron Man tears the locked door down and
continues to give chase. He spots the Angel standing atop a water tower,
waiting for the Evil Mutants to show up, and puts into action a daring
and risky plan. He hurtles towards the Angel and tackles him, knocking
him off of the water tower. Not letting go, they race towards the sky,
climbing further and further upward, until finally Iron Man’s jets run
out of energy and he begins to fall. Iron Man reveals that he is
gambling that the Angel is truly good and will not allow him to fall to
his death. For many tense seconds, nothing happens. Then, at the last
second, the Angel realizes that he doesn’t want the armored Avenger to
die, and swoops down to grab him just before he hits ground. This serves
to snap him back to reality, reversing the corruptive effects that
radiation had on his mind.
Afterwards, Iron Man explains to the Angel that his personality
was affected by radiation from the atomic explosion. The X-Men arrive on
the scene, having observed the battle, and thank Iron Man for saving
their teammate from his evil self. Iron Man subsequently flies back to
Stark Industries. On his way, Professor X communicates to him, telling
him he’s now indebted to the Golden Gladiator.

|
“The Start of the Quest!” / L’ INIZIO DELLA RICERCA (2a parte)
|
|---|
Featured Characters:
Supporting Characters:
Antagonists:
- Krang
- A giant squid (First appearance)
Locations:
Synopsis
Continued from last issue…
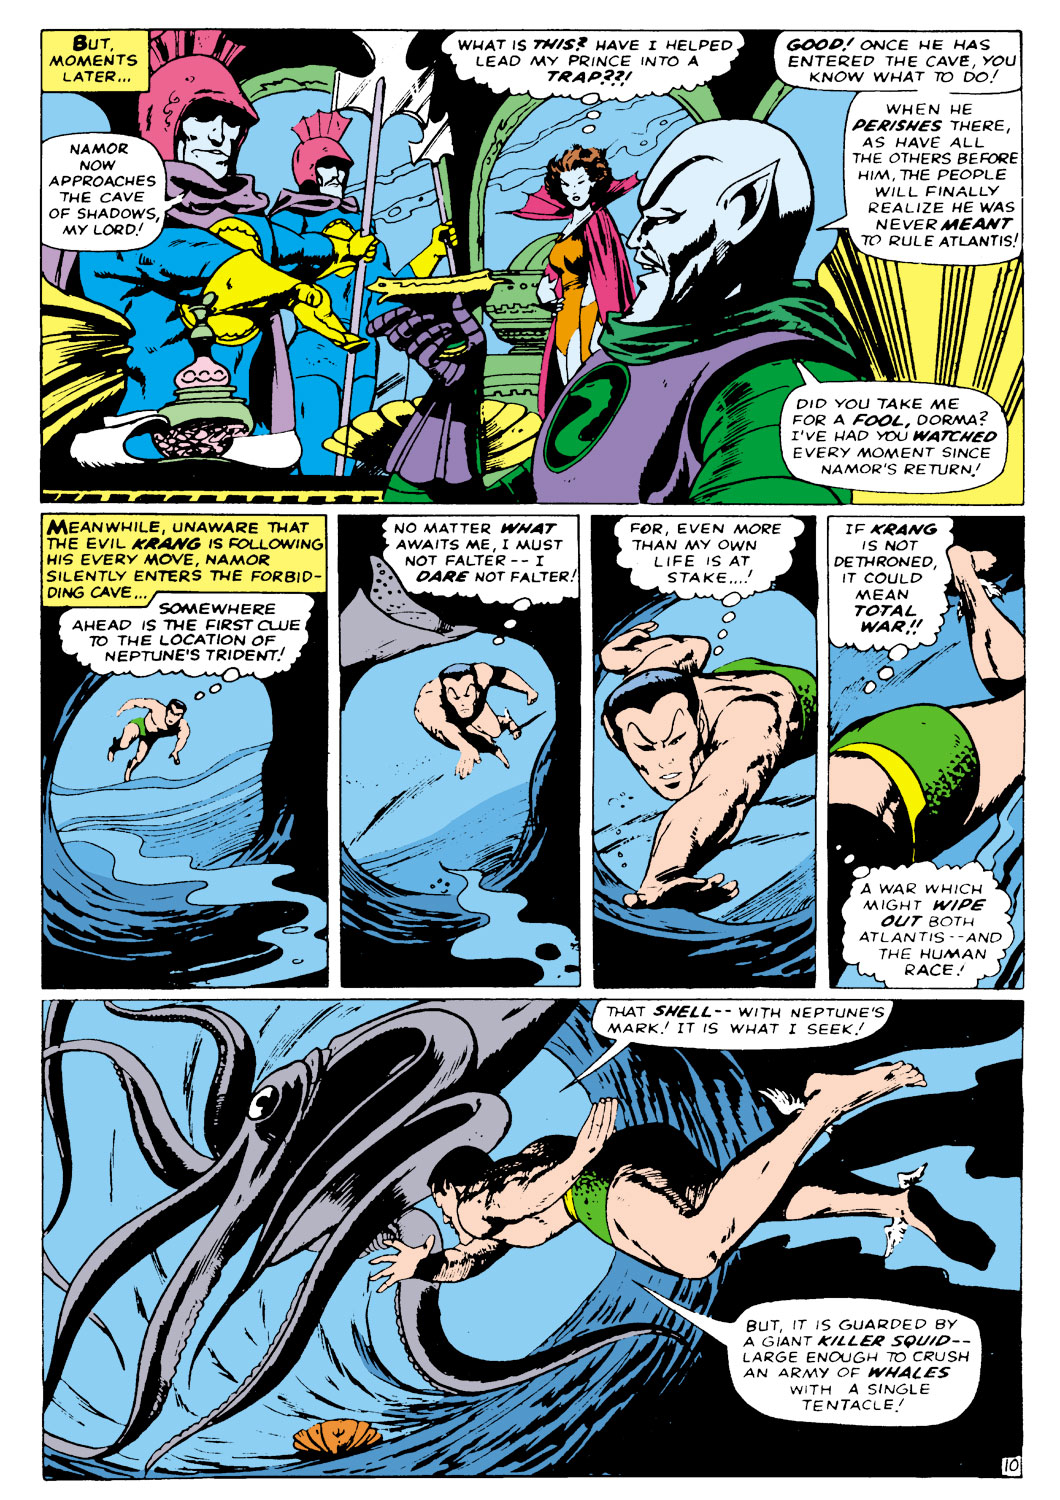
Sneaking out of Atlantis, Namor swims off into the sea. Dorma watches on and is suddenly intruded upon by Krang. Krang gloats that this is exactly what he had plotted all along, hoping that Namor would be destroyed trying to find Neptune’s trident.
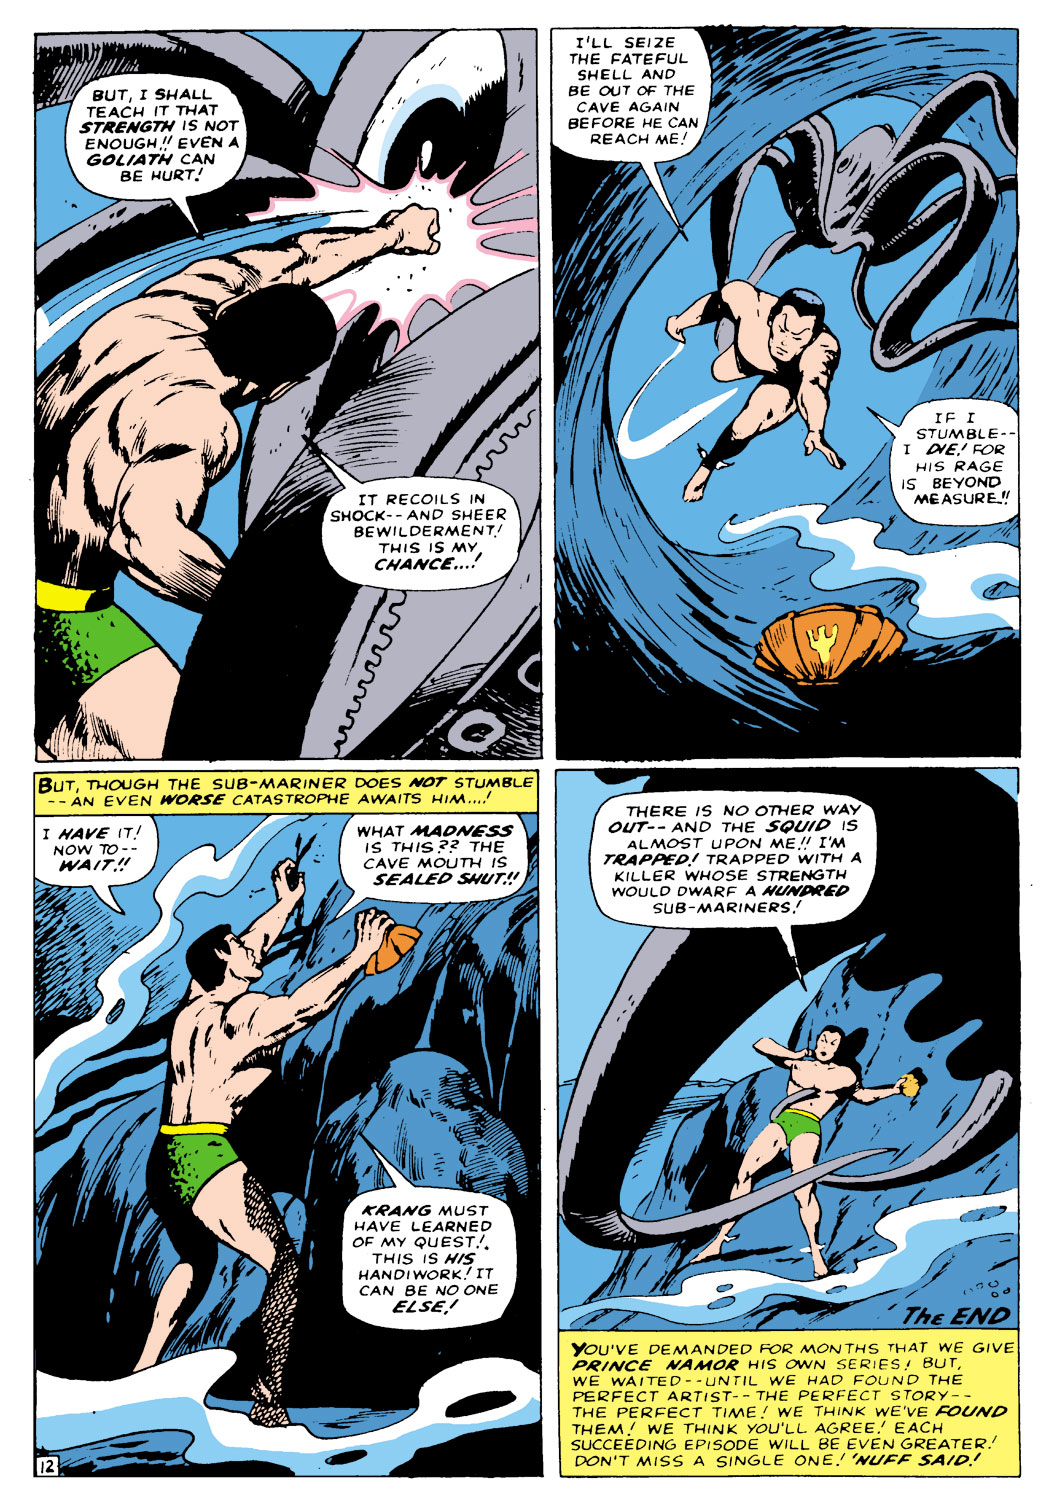
This becomes apparent as Namor heads to the location of the first clue, which is defended by a giant killer squid. Spotting a shell that has Neptune’s mark on it, Namor attempts to battle the squid.

Slipping past the monster he grabs the shell, but he doesn’t get away fast enough and the squid is approaching too close for comfort.

|
“Escape…to Nowhere!” / FUGA NEL NULLA (1a parte) storia pubblicata in soluzione di continuità a quella precedente con omissione della splash-page / missing splash-page
|
|---|
Featured Characters:
Supporting Characters:
Antagonists:
Other Characters:
- Father Neptune (Vision)
Locations:
Items:
- Enchanted shell with Neptune’s mark
Vehicles:
- Hydro-powered soil mover
Synopsis
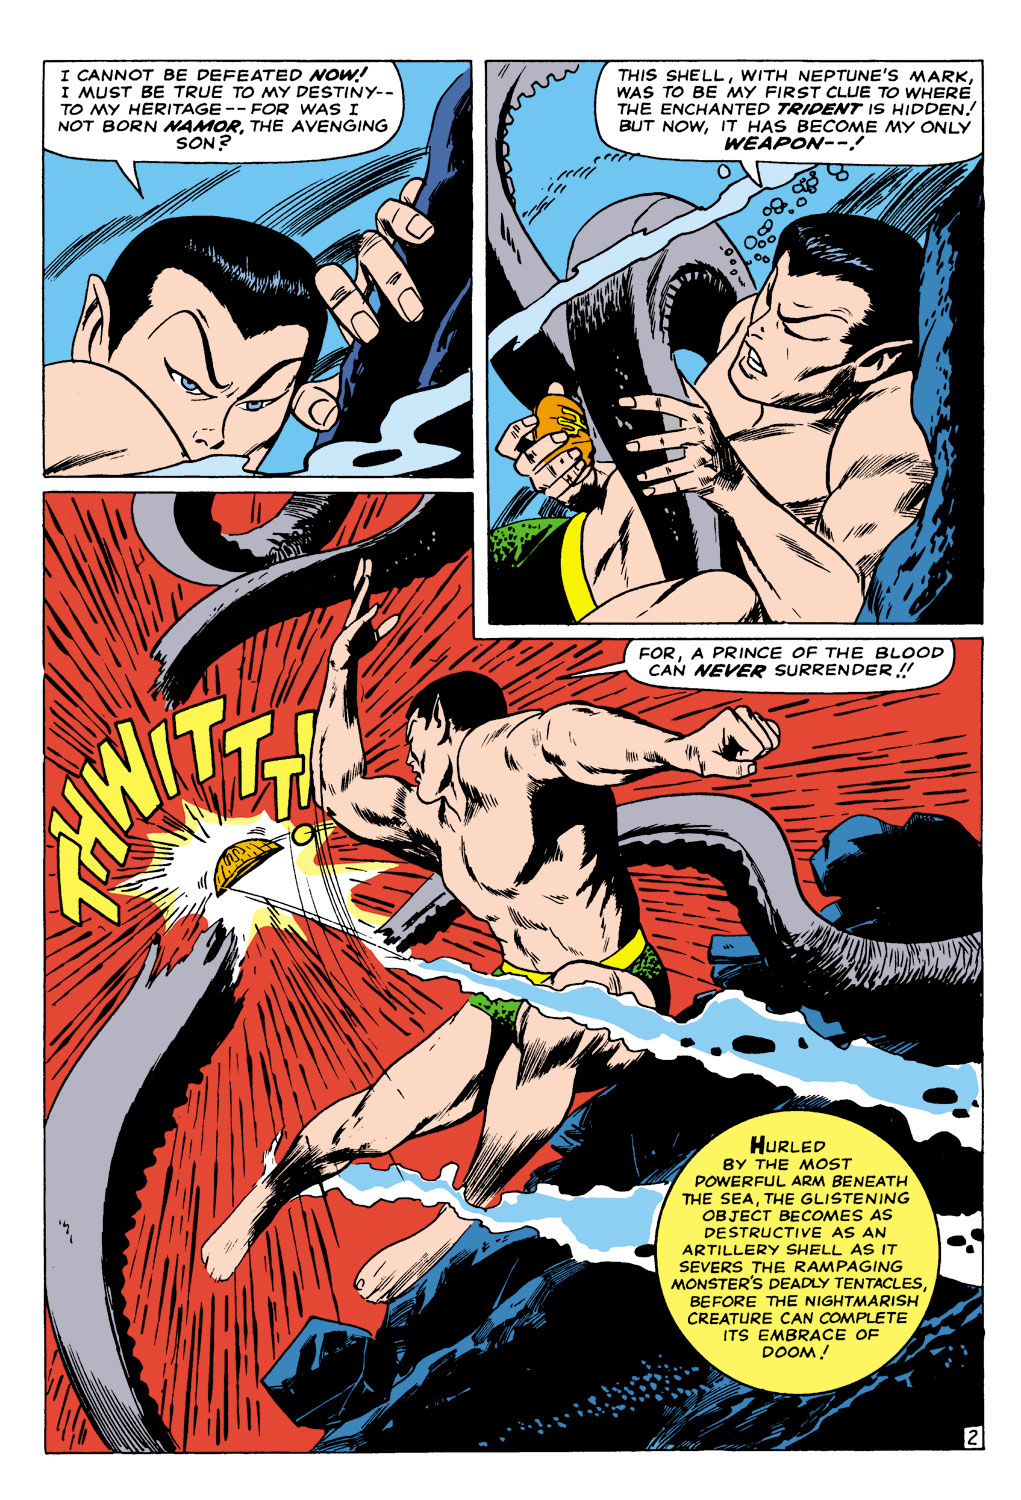
Namor is trapped by a giant killer squid that is protecting the
cave that has the first clue to Neptune’s Trident. With nothing else to
defend himself, he uses the clue, a shell with Neptune’s mark, to slay
the creature. With the monster dead, Neptune’s spirit appears before the
Sub-Mariner and congratulates him for passing the first test. The
spirit tells Namor that he will have to travel to the Forbidden Depths
in order to find the next clue to the Trident’s location.
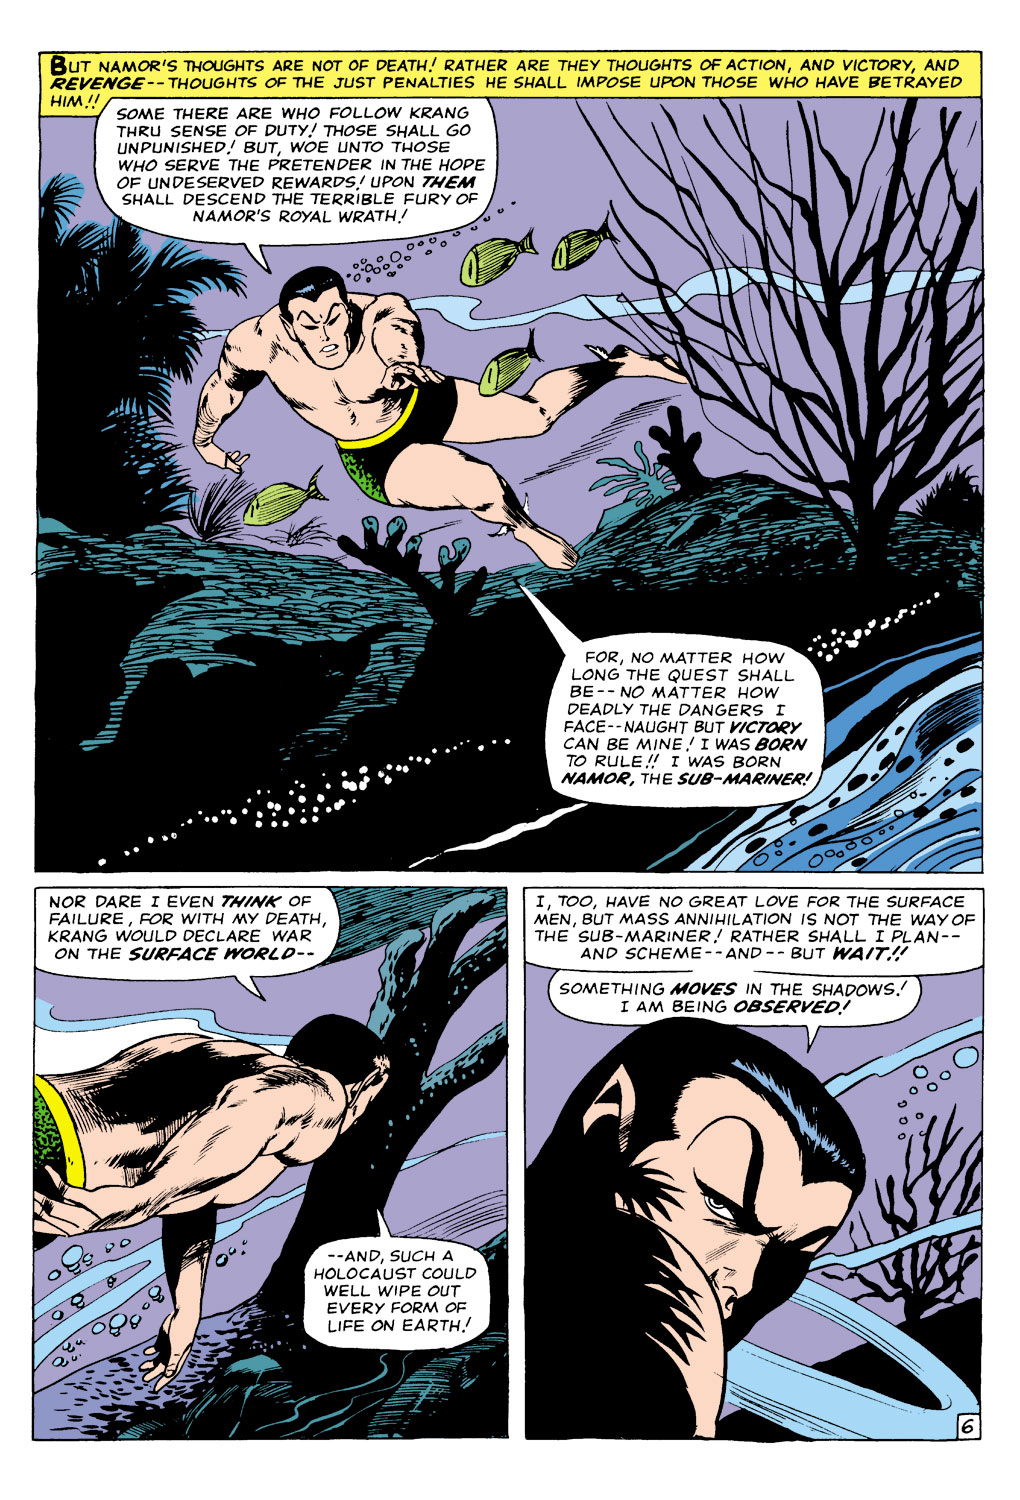
Boring his way out of the cavern, Namor is attacked by minions of
Warlord Krang in an attempt to kill Namor. The Sub-Mariner easily
defeats them and swims off to his next location. Monitoring this from
afar is Krang who is furious but has not given up destroying Namor. Lady
Dorma, his helpless prisoner vows that if Namor dies her heart will die
with him as she truly loves him.
As the Sub-Mariner approaches the Forbidden Sea he sense that he
is being followed.
Continued to next issue…